fbpx
Ardent Roleplay

Ardent Roleplay

Create Your First TTRPG AR Encounter

Hello and welcome

to Ardent Roleplay

Today we are going to show you how easy it is to set up an augmented reality encounter for any tabletop RPG of your choice.  

Watch the video below, or follow the instructions as written in this article

Watch the video below, or follow the instructions as written in this article

Play Video

1.

Download Ardent Roleplay desktop & mobile Apps

The first thing you’ll need is access to the Creation Kit on your desktop, you can find downloads for Mac and PC just below, or at ardentroleplay.com/creationkit.

You will also need to have downloaded the Ardent Roleplay mobile app on your smartphone or tablet.

2.

Open the Creation Kit & create your first Campaign

Now that you’re all set up, let’s create your first AR encounter in Ardent Roleplay’s Creation Kit desktop app!

Once you have logged in to the GM creation kit, you’ll come to this screen.

It’s worth noting that there are pre-made campaigns and adventures you can access from this screen.
For now though, we are going to click on ‘Create New Campaign’.

Here we can enter our campaign name and a brief description.

For now let’s just call it ‘My First Campaign’. Make sure you save the changes

3.

Create a new AR encounter

Next we want to create our first new encounter.

In Ardent Roleplay, encounters are essentially the individual AR models you choose to present to your players during a game.

Later, we will assign these encounters to cards for players to scan.

Click on the ‘Encounters’ button from the main menu…

Then click ‘Create New Encounter’.

From here, you see a list of available content packs you can choose from

To preview what assets are in these packs you can look through our content catalog on our website or through the store in the mobile app.

For now let’s just use the High Fantasy Core Pack which is 100% FREE.  When you click on this pack option you will see a list of available models open up on the right side of the screen…

For this encounter lets select the ‘Rural Hut’.

4.

Customise your encounter with states

This screen is where you can customise elements within your encounter (within the model you have just chosen).
These customised scenarios are presented as different States that you can send to your players anytime during a game.

Towards the top of the screen you will see some categories you can use to organise your states.
These are Approach, View, Reveal, Resolve. (It is completely optional to organise your states in this way)

Follow the steps below to create 7 states within this Rural Hut Encounter.

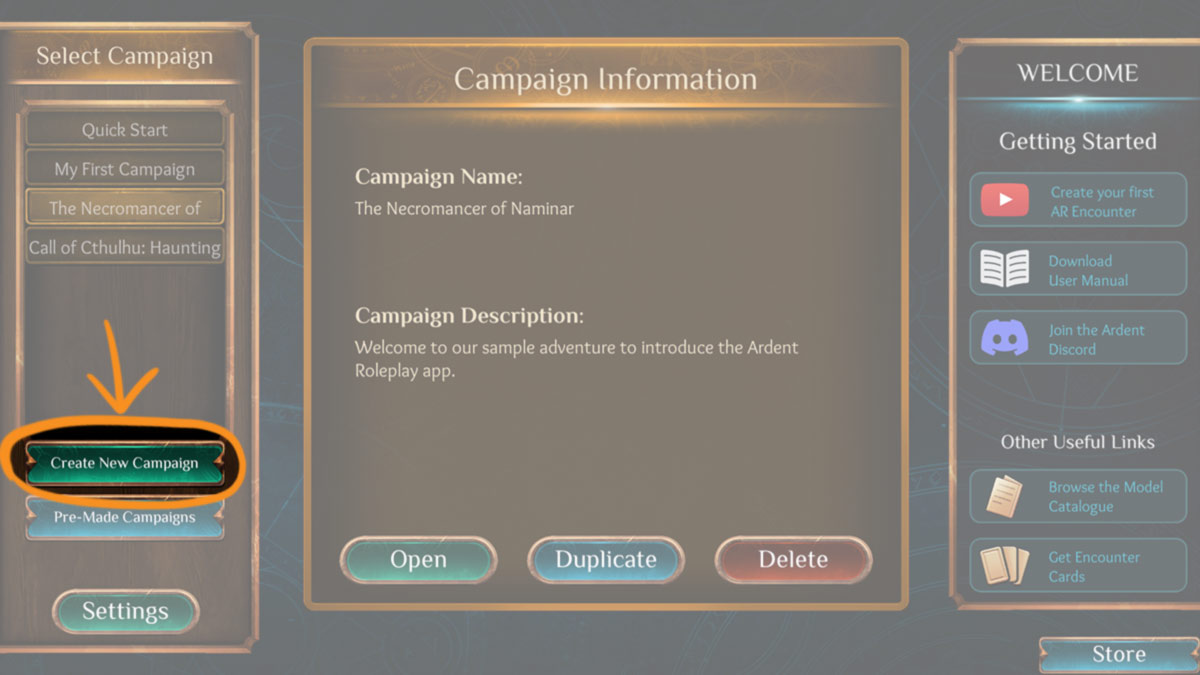
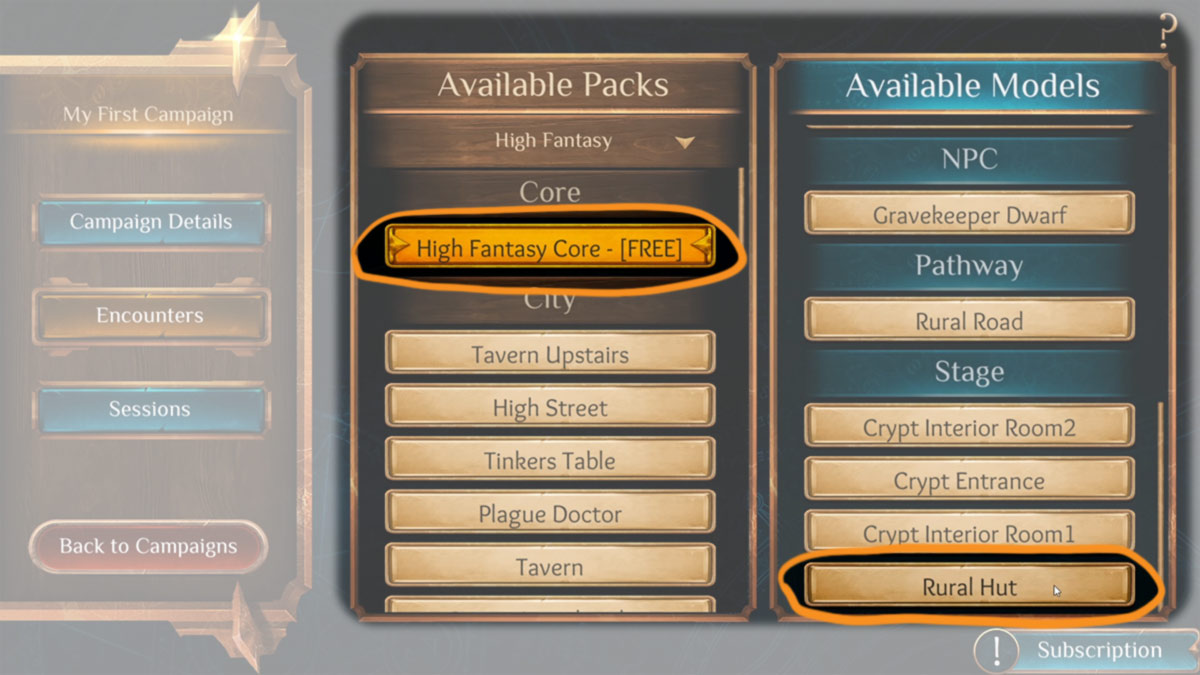
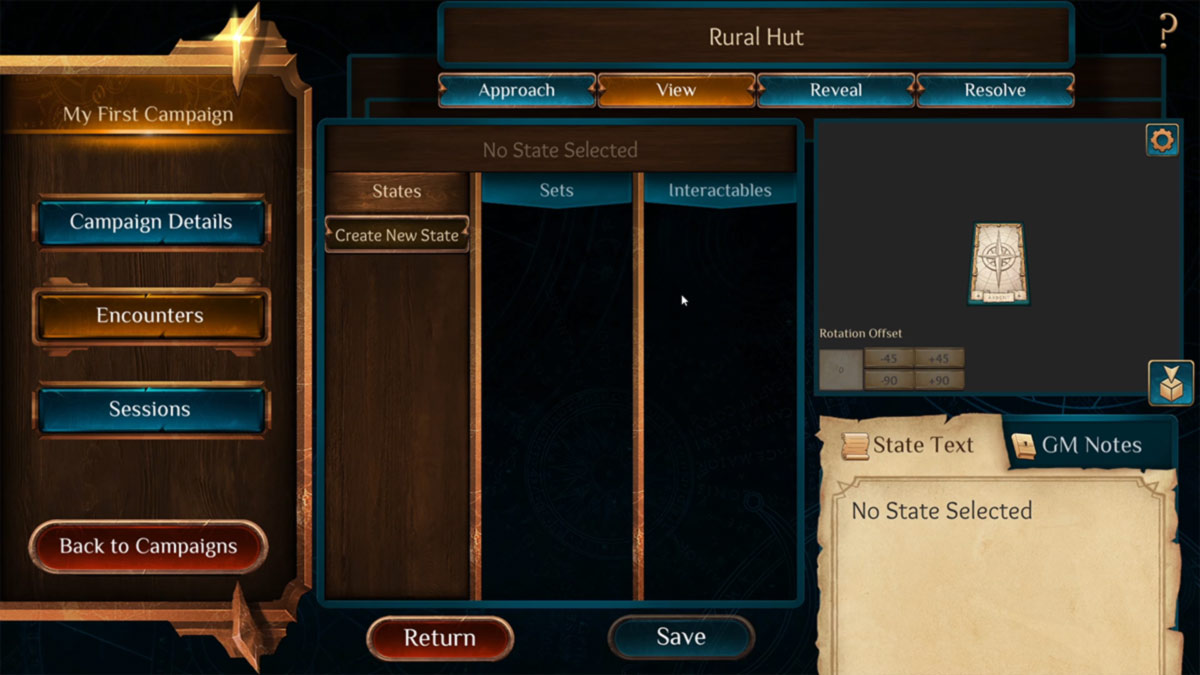
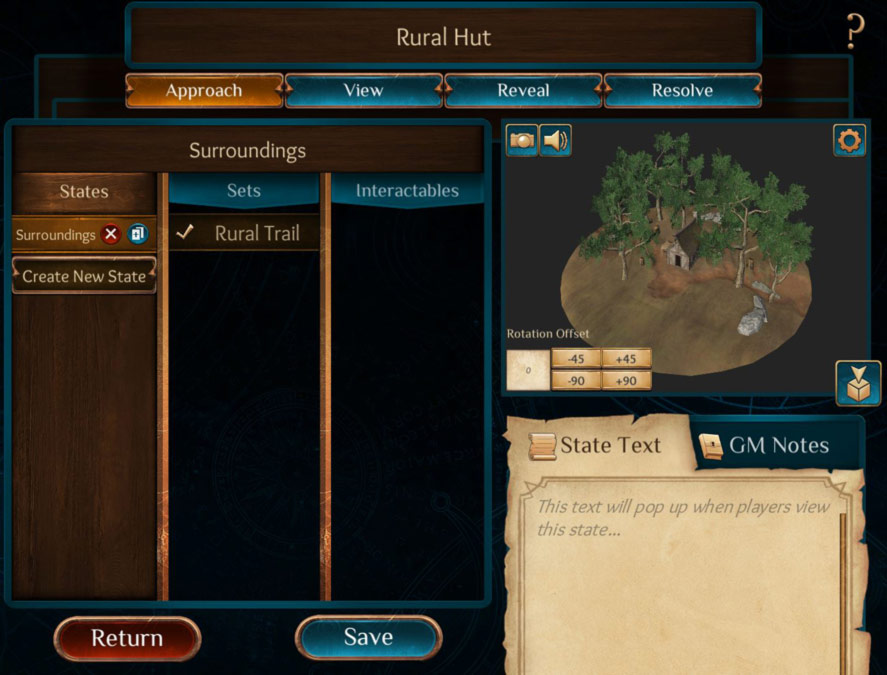
For our first State we want to select the ‘Approach’ category.

Here, I want to create a State that I can send to my players showing the outside surroundings of the Rural hut – just as their characters would see when they make their initial approach to this encounter.

Begin by clicking ‘Create New State’Now I will want to give this State a title by clicking on ‘Unnamed State’ and typing in a title – to keep things simple we will call this state ‘Surroundings’.

ClickSave‘ to save your changes

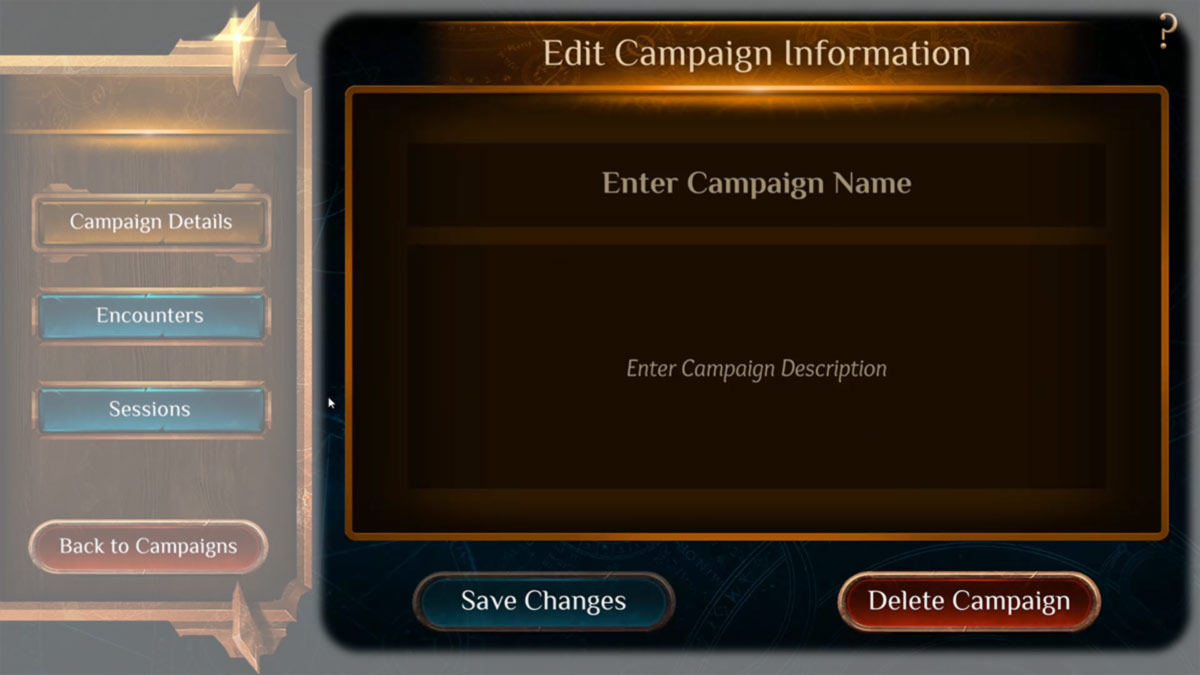
Now let’s create a state that we can send to individual players as they enter the hut.

For this, I am going to go to ‘View’ and ‘Create New State‘.

Here we have some more options to customise our states. You can click on options in the Sets and Interactables columns to check them on/off. See the changes in the preview window on the right.

First we will want to show players the inside of the hut > check ‘Rural Hut (+Walls and -Roof)’ in the Sets column to remove the roof.

Let’s say I want the door to swing open > check on the ‘Rural Door (opened)’ Interactable

And I want to add a Puzzle box sitting on the table > check on the ‘Puzzle Box (Undisturbed)’ Interactable

And for some intrigue, let’s add a dead corpse > check on the ‘Male Dwarf (Corpse)’ Interactable

Give this state a title – let’s call this state ‘Inside’.
Click ‘Save’.

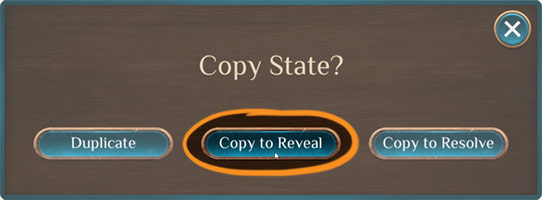
Now we want to create some states that we can send to players as they interact with this scene we’ve created. Things we can reveal to them. 

So let’s first create a copy of our ‘Inside’ state so we can add to this existing scenario. Click on the copy icon next the title. And we will want to ‘Copy to ‘Reveal’.

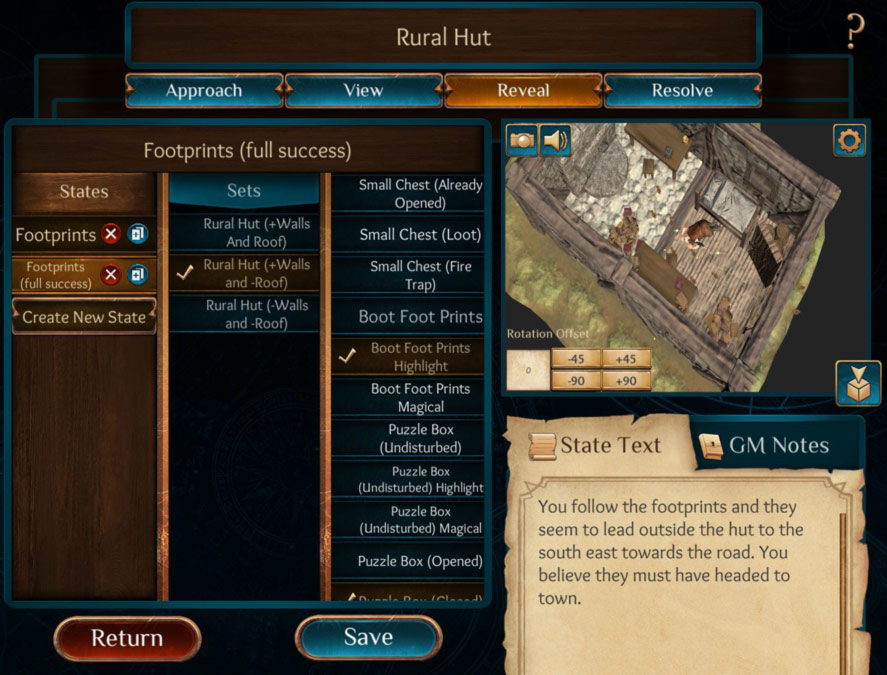
Now when we go to Reveal we will see a copy of the inside state there for us.

We want to reveal footprints in this state, so let’s rename this state to ‘Footprints’ and turn on the interactable ‘Boot Foot Prints’.


I might send this state to a player who has just passed a perception check and notices footprints heading to the door.

A player might roll high on a survival or tracking check and find out a little more information about those footprints. So let’s copy this state to create a new one (Duplicate) and rename it, ‘Footprints (full success)’.

This time we turn on ‘Boot Foot Prints Highlight’ (turning off ‘Boot Foot Prints’) and add some state text which players can read when they view this state.

Add State Text by clicking on the area where it says ‘This text will pop up when players view this state…’, and type.
For an example, let’s add, “You follow the footprints and they seem to lead outside the hut to the south east towards the road. You believe they must have headed to town.”

Click ‘Save’.

Now, players may search the room and find the Puzzle box on the table. So let’s create a state that highlights the puzzle box.

For convenience, let’s just copy our footprints state (Duplicate) and rename it to ‘Puzzle Box’.

Turn off the ‘Boot Foot Prints’ Interactable and let’s add a highlight for the puzzle box > check on ‘Puzzle Box (Undisturbed) Highlight’.

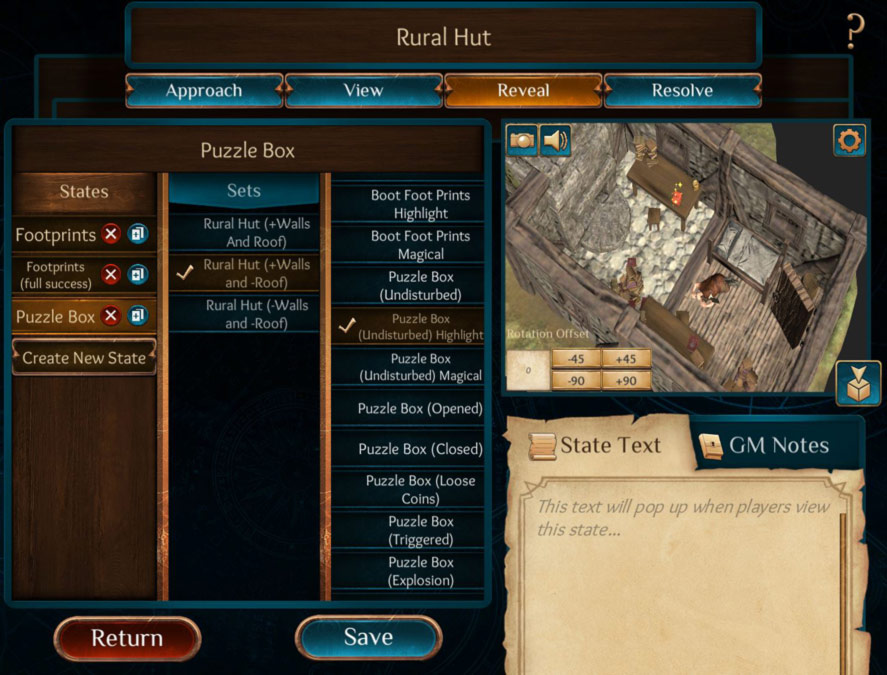
As we did before, we can add a little state text to give players more information about the box if we wanted to.

When done, click ‘Save’.

Now let’s say this puzzle box was indeed a trap and an unsuspecting character picks it up, how does this scene resolve itself? 

Let’s copy our ‘Puzzle Box’ state and copy it to ‘Resolve’. Rename the State to ‘Puzzle Box (Triggered).

Now we want to turn on ‘Puzzle Box (Triggered)’ [turn off ‘Puzzle Box (Undisturbed) Highlight’].

Choose either an explosion or fumes as a consequence… let’s go with the explosion > check on ‘Puzzle Box (Explosion)’

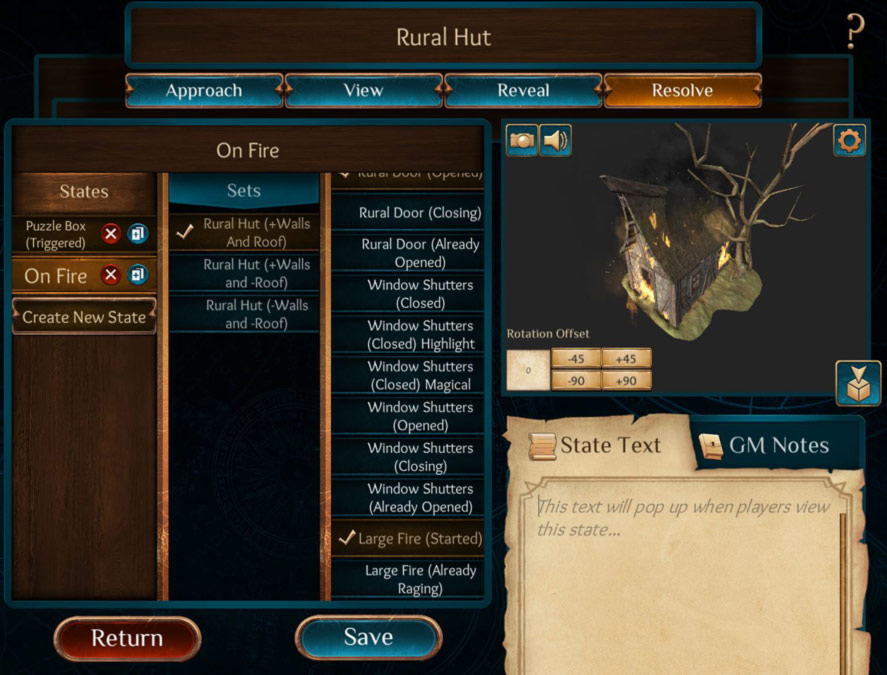
Unfortunately, the explosion from the puzzle box trap may set the hut on fire, so let’s go ahead and create a state for that as well.

Copy the ‘Puzzle Box (Triggered)’ State (Duplicate) that we just made.
Rename the state to ‘On Fire’.

Turn on the Interactable ‘Large Fire (Started)’.

Let’s also change the Sets option to ‘Rural Hut (+Walls And Roof)’ to show the whole hut on fire.

Click ‘Save’ to save all your changes.
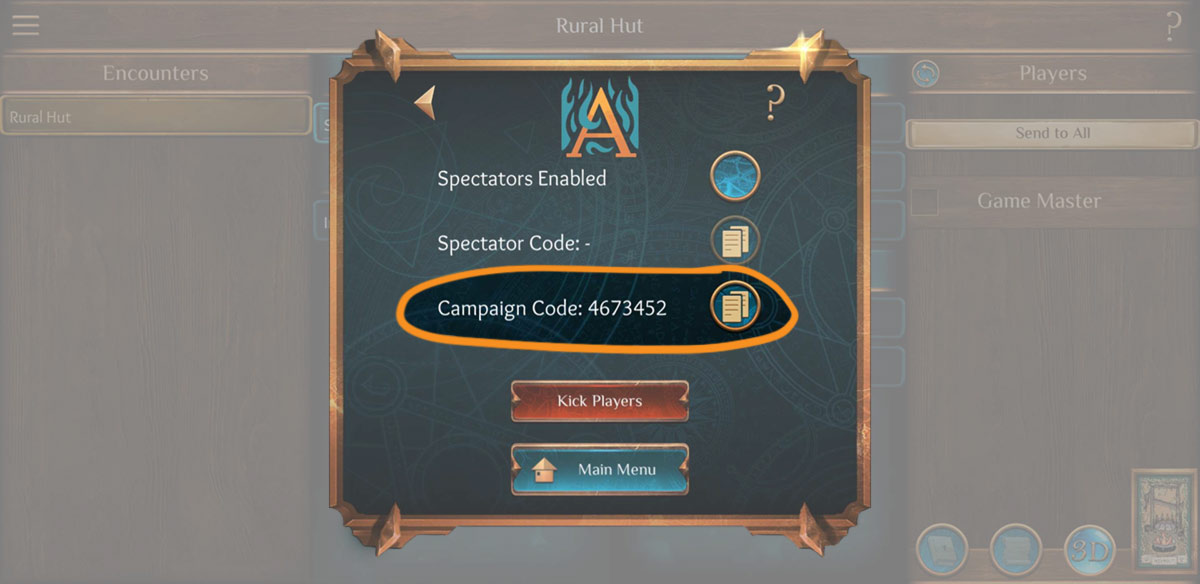
5.

Allocate a card to your encounter (preparing a Session)

Now we have created and customised our encounter, we want to allocate a card to it that players will scan with their phones to see the AR model during a game. We do this in the Creation Kit when we prepare a Session.

Go to ‘Sessions’ on the left hand menu

And let’s ‘Create New Session’

Here we come to the Edit Session screen below. At the top in the blue section, we have our session information – a title and description that we can edit. Let’s name this Session ‘My First Session’

On the right hand side we have a list of encounters you’ve created in this Campaign so far. We can see the rural hut encounter we just created.

To add this encounter to this session we want to click on ‘Rural Hut’ from the list to allocate an encounter card to it.

Here we have a list of card suits you can choose from. We are going to use the ‘Free High Fantasy Print and Play’ suit.

Let’s choose the ‘Hideout’ card (click on the card image to select).

You can now see the Rural hut encounter sits within our session and has been allocated the Hideout card.

Click ‘Save’.

You have now created your first encounter, session and campaign in Ardent Roleplay.

Make sure you have saved your session and closed the Creation Kit.

Congratulations, you've created your first AR Encounter in Ardent Roleplay!

So how do you host this AR encounter in the Ardent Roleplay mobile app?

Let’s quickly take you through it.

Log in and load your Campaign & Session

Once you are logged into the mobile app, make sure you are toggled as GM.

You will want to load in the campaign and session you just created in the Creation Kit

Press this icon

⇨  ‘Change’ Campaign
⇨ Select ‘My First Campaign’ ⇨ ‘Continue’

⇨ Check correct campaign & session are now selected
⇨ Press back icon (to main menu)

⇨ Then press ‘Host’.

Previous
Next

Game Master Control Panel

After you press ‘Host’ you will be taken to the GM control panel which you will use to send states to your players during a game session.

On the left you can see your Rural Hut encounter and any other encounters you may have added to this session.

In the middle, all the states we just created for the Rural Hut.

In the bottom right corner you can see what card you have assigned to each encounter (press to enlarge card image).

Getting Players to Join

To get players to join this campaign, go to the burger menu in the top left corner to find your Campaign Code.

Send your players the Campaign Code so they can use it to join your campaign.

Once they have joined, players will show up in the player list on the right side of the screen.

Sending States to Players

To send a state to a player, we simply select the state we want to send and then select which players we want to show it to. If you want all players to see it, press the ‘Send to All’ button.

Your players will see the changes in real time while they are scanning the encounter card.

Further information & guidance

Ardent Roleplay offers further functions and features as well as hundreds of models that a GM can utilise within a game. That’s something we can explore another time. 

If you have any further questions, feel free to join our Discord and/or join one of our live demos.

Discord
Community

Tips for
Game Masters

Creation Kit
User Manual

YouTube
Videos

Discord Community

Share this post